Tuesday, June 30, 2009

Heaven in a Circle

Well I have always loved Peanut Butter cookies. I have just never made them. I have also mentioned them to Jr. Chef plenty of times. But every time I mentioned making them. He would give me this grunting noise. You know that noise. The ones kids give you when they do not want to do something. Well today we were stuck home on a rainy day. I was not about to leave the house for anything. So that is when he gets desperate. That is when he realizes he has to figure something for us to make or he will go mad.

So while I was looking around on my favorite blogs. I had come across Peanut Butter cookies from Brown-Eyed Baker. She always makes everything look so good. So why not try out her recipe for PB cookies. Well since Jr. Chef had nothing to do and because he really wanted to make something. He finally decided that he would allow me to make some PB cookies today.

I have to say this was one of the easiest recipes I have ever tried. I also have to say that they came out delicious. Or how Jr. Chef put they were " Heaven in a Circle". Yup the one that didn't even want to make or try them. Is the one who decided that they were the best cookies that he had ever had. Isn't that funny how that works out.

I will also say that I didn't change anything from the recipe. But if you like a less sweet cookie. You will want to refrain from rolling in the sugar. Jr. Chef loved them. But as much as I love sugar. They were really sweet with the sugar on the outside.


Tada!

When you finish mixing all ingredients this is what your dough should look like.


If you are as lucky as I am. You will catch your Jr. Chef dipping in the bowl. Of course when he is not supposed to. Lets just say I had a big problem stopping him and was glad the cookies were just for us. Or he would not have been allowed in the kitchen.


Momma is that enough to make my cookie ball?


Now that is a perfect ball isn't it? OK well close enough.


Now roll the ball of dough in your white sugar


Here they are laid out on the tray.


Here is what the cookies look like when I did the fork indents.


Here they are all baked up.


Then we decided to try another batch with some peanut butter chips on top. These were actually my favorite.
They gave the cookies the extra kick of peanut butter and lightened the sweetness of the sugar.


Then I decided to see if I would be able to make an impression on the cookies with an fondant cutter. I have some plastic ones and if you flip them over you can make an impression. I mean what would it hurt to try. Right? So this is how they came out. Now that I really do know it works. There are so many things running through my mind.


So tell me do you prefer peanut butter cookies with or without sugar on the outside? Leave me a comment I would love to hear from you.

Monday, June 29, 2009

Buttered Chicken Tenders

OK so I was making my Buttered Chicken that I love so much and as I was making it. I was speaking to one of my girlfriends on the phone. Well as I stated to her that I was making Buttered Chicken she asked " What was that"? I told her what it was. She stated that she had never heard of anyone cooking chicken that way. So she thought it would be good to show others how I cook it. Even though I do not think it's a big deal and thought everyone did it. I agreed to put here on the bog. I mean what could it hurt right? There might be someone else out there who has never cooked it this way.

I will have to note. If you do not have time to wait for the seasoning to kick in. This is the best and quickest way I know of to get tasty chicken.
First you would like to melt some butter into a frying pan. I would say about 3-4 tablespoons.
When the butter is nice and hot. Place your unseasoned chicken into the pan.

At this point you will want to add your seasonings. I have added Garlic Pepper, Mrs, Dash Original Blend, and some Adobo of course. I put in about a pinch of each seasoning on each piece of chicken. The Adobo you may want to put a little less as it can make your food salty.

After you have seasoned the chicken turn over.


At this time you will repeat the seasoning step.

Keep frying till you actually see the butter fade away. You will start to see some brown spots and that is the seasoning cooked onto the chicken. If you are not sure that your chicken is ready. Please make a slit in your chicken to make sure that it is fully cooked.

At this time you can serve with whatever you like to eat with chicken. This night we wanted mash potatoes. We love to eat Garlic Herb mash potatoes.

Well now it's your turn to try. If you make butter chicken in your home. I would love to hear how you make it.

Once again from our kitchen to yours. Thank you for joining us for another session of Meals with Momma and Jr. Chef.

Saturday, June 27, 2009

No More Giant Cupcake and Upcoming Giveaway

Hello all Momma here,

I have always wanted to say that. lol Well my battle with the giant cupcake will be put on hold at this time. The event that I was going to be doing it for was sadly canceled. So now it is waiting for the next event that I can make it for. I am thinking maybe August since I have a couple birthdays that month.

Hopefully something will come up before that cause I have been waiting so long to make one. As we all know that first attempt did not go very well. But no fear. I will try again. Heck if we have to eat cake for a week. I will try it.

But on a better note. I wanted to announce ahead of time. That Jr. Chef and I will start holding giveaways the first week of July. I wanted to make sure that I told everyone ahead of time since. I just started out and I know some of you pop up daily and some come around here and there. I want to make sure that we get the word out. I wanted to make sure if you weren't following BM & JC now would be the time you may want to. Things are about to get even more exciting around here. So stay tuned for July cause Momma and Jr. Chef are about to start giving away.

Tuesday, June 23, 2009

I need your help!

Where do I start? I have a birthday party this weekend that I am doing the cupcakes for. Right! Well I didn't just want to do cupcakes. I wanted to try out my new Giant Cupcake Mold from Wilton. Well any time I try something new. I always do a trial run. Plus you best believe that if I even try to forget to test it out first. My dear hubby will make sure that I do the test run. He doesn't want to deal with the tears and complaints later.

So tonight I decided that I would try out the new pan. Well guess what it didn't work out for me! So I am asking anyone who may have tried this pan to let me know how you came out with that perfect cupcake. Or if you had problems. I would love to hear about it so I know that I am not alone. I mean how hard could it be right? Make the batter pour and bake. Well luckily I listened to hubby this time because the pan wanted to cause me problems. Now I know what your thinking I didn't grease the pan. Well I did. I greased that pan so good with spray it should of slid right out like it always does when I make any other type of cake.

Well that pan wasn't going to let go without a fight. Look what that darn pan did to my cupcake.


I was tapping,massaging even talking to the darn pan. But nothing! I used a pound cake recipe. Not the one that comes with pan but another. I figured the weight would have pulled it out good. But now I was literally fighting with this pan to let my darn cake go. It is Tuesday time is running out. I have a vision of what it is all supposed to look like. But right now that vision is shattered. Help me please.

My Bad!

OK so I was told today by one of my fellow supporters and one of the closest people to me (my little sister) that I really need to work on my measurements. In her words "you really need to tell us what your measurements are for us cooking dummies". Like I said her words. As I apologized I also explained that I do not measure. I just eyeball it. I know I know. Not all cooks do it that way. But I really do not have the time to sit there and measure stuff. So I go by look and taste. But as I told her in this deep conversation we were having. I would going forward try my best to put in measurements for everything. But as I was talking to her I went into the zone. You know what I mean. You imagine yourself doing something you love and you get into the zone. lol Well I told her OK if you want to measure the way I do. I do 6 shakes of all seasonings that I put in my food. Unless otherwise mentioned. Of course she laughed and asked "6 shakes"? I said yes take the bottle and shake it six times into what you are cooking.

So my friends unless it is otherwise mentioned it will take six shakes to make it taste the way I make my dishes. 8) I hope that helps. But as stated above I will try my hardest to make sure I put in measurements.

Sunday, June 21, 2009

Polish Kielbasa and Veggie Mix

Happy Sunday Everyone,

Today I wanted to share how we make Kielbasa in our house. Part Timer loves this and he can eat it alone. With out anything else. So since it is really quick and it makes him happy. I made it for him for Father's Day.

Ingredients:
Polish Kielbasa
Onion
Mrs. Dash
Garlic Pepper
Steak Rub
Pork Rub
Water
Bag of vegetables ( We used microwaved ones)

See how pretty and colorful it is.


This is the Kielbasa we have used. Sometimes we use fresh if we can find it. But this is about 2.98 at your local wal-mart.


Use about a 1-2 cups of water and slice your Kielbasa and put into a frying pan.


These are the seasonings that I use to add to this dish.


I add about two pinches each of the Rubs. The other seasonings about the same. I also use the Adobo if I need a little more saltier taste.


Slice your onion and place in the pan.


On top of that I like to add a little bit more seasoning.
Warning this is very spicy.


This is how it will start looking when your onions are cooking.

Now take your vegetables and cook in microwave if you do it this way.


After the veggies are done. Place in the pan with the rest of the food.


After I have done this. I like to give it a good couple of stirs. To get it nicely mixed in there.


This is what it will look like when your food is nice and ready.

Thanks for joining us on Meals with Momma and Jr. Chef

Saturday, June 20, 2009

Arroz Con Salchicha ( Rice with Vienna Sausage

Hello everyone,
Well here in my house one of the quickest meals to make is Arroz con Salchicha. Yes Jr. Chef loves this and will eat it all up and alone with nothing else. These are the days when we do not need to feed Part Timer and we can make something quick. So I thought I would share with you how to make it. Some of you may already make this in your home. Probably close enough to how I make mines. But after speaking to a close friend of mine and a supporter. She stated that I should post all the meals I make no matter what. Since there may be some who have never made it. Or some that make it different. So here I am posting my version of Rice and Vienna Sausage.

Note: For those that cannot eat pork based meats. You can substitute with chicken.

Ingredients:
Rice
Tomato Sauce
Sofrito ( My recipe to come)
Sazon
Oil
Water
Adobo
3 cans of Vienna Sausage

So this is what we ended up with when we we're finished. Can you tell what kind of fancy plate that is? lol

First I place about a tablespoon of oil in the pot.

Then I add an 8 ounce can of tomato sauce. I also add the Adobo and Sazon. As stated in previous recipes.


Here you will take the sausage and start to slice into pieces. Don't you love the floral? What was I thinking? Oh I know I didn't want to start looking for one of my cutting boards lol.


After you start slicing the sausage make to start putting into the sauce. The sauce is on medium while you are adding all the ingredients.


Here you have the three cans of Vienna Sausage.


At this point you will add three cups of rice and about three and one half cups of water.


This is Sofrito. Now some of you know what this is? Some of you are saying. What the heck is that? ( I will have my recipe coming up for this) But right now I can tell you in my opinion it is essential to have. You can buy this in the Spanish Section of your local supermarket. But I will be honest with you that it is best to have homemade. It is a very strong seasoning. But oh does it make your food taste so delicious. I use it in my colored rice and on my meats. Yummy!


I have added a tablespoon of Sofrito. I have also raised the temperature to high. I will leave on a high until it comes to a hard boil.


Yup I think that is looking good. At this point I will put on low-med. For about 15 minutes with lid on.


When you take off lid. Your rice should look this way. As you can see there is a little liquid still left. At this time. I mix up the rice and leave for about another 4 minutes.


Then you will have your finished rice.
Ok well now its your turn to try. I know I know I owe you the recipe for Sofrito. I will have my recipe in an upcoming post. But for now you can try this one.


Once again from our kitchen to yours. Thank you for joining us for another session of Meals with Momma and Jr. Chef.

Sunday, June 14, 2009

Baked Ziti Two ways

Happy Sunday everyone. I will be away from the computer for about a week. So I wanted to make sure that I got in a long filled post. I will still be able to receive your emails and comments As they come to my blackberry. I just will only be able to respond to the emails. I will not be able to reply to the comments till I come back. I know I know a little tricky. But I wanted to make sure that I would be able to still keep in touch.

Well today I will be showing how we make Baked Ziti in our home. Since 2/3 of us like our Baked Ziti one way and the other 1/3 likes it another. We have a full day of cooking. So today we are also welcoming Part-Timer. That is my hubby. Who is a great cook. Just a little shy and will join us part of the time. When we need all hands on deck to make a meal.
First I would like to start with PT's version. Jr. Chef and I like our Ziti a little more plain and I figured let's get the tough one out of the way.


Ingredients: (Please note you may not see photos of them all. But they are in there)
1 pound of ground beef
1 green bell pepper
1 whole onion
1 whole garlic
Italian Sausage ( we used hot and mild) 5 total
1 box of Ziti noodles
Pasta Sauce of your choice. We use Del Monte Traditional, and Garlic and Onion
Water
Oil
Onion Powder
Peppercorn Melange
Mrs. Dash Original Blend
Mozzarella Cheese
Ricotta Cheese

This is what your Ziti will look like when it is finished.Here are some of your ingredients. Pepper,Sausage, and ground beef.

First you will need to cut your Italian Sausage in slices.


Then you need to slowly cook them in a little bit of oil of your choice. I cook for about 15 minutes. They end up back in the pan a few times. So they will be completely cooked when finished.


Chop your Onion and Bell Pepper

Take your whole garlic

Make sure to crack open and take all pieces out of peel. Then chop into smaller pieces. (oops forgot that pic)


You will then place peppers,onions and garlic into the sausage that is cooking. At this time you will also put in the rest of your seasonings. Please put in the amount that best suites your taste. AS we like our food with a lot of pepper and garlic it may be too much for someone else.


At this point you have also added the cooked ground beef. Yes there was a photo for that one. But after realizing that I uploaded everything. I saw that I was missing that photo in this part. But it will be down below in the second part. As I had to use chop meat there too.


Here we have now added the pasta sauce and we let this simmer for about 10-15 minutes on low while we boiled the noodles.


Once the noodles are done you will drain and then mix with sausage and meat mix.


Now pour in your Ricotta. PT loves Ricotta and can never have enough so he uses the whole jar. It was the smaller jar. Once again this goes by how much you love Ricotta. As Jr. Chef and I do not like Ricotta we leave that part out.


Then mix in the pot till it has all melted and looks nice and creamy like this.


After you have it all nice and mixed you will place in the plan that you will bake it in. Make sure to spread out evenly. Also we PT likes to flatten it. So that is keeps it together better and there are no over spills while cheese is melting and it is baking.


Here you are now going to add your mozzarella cheese. We actually buy a pound and use that per each Ziti. We also buy a block of the cheese and shred at home. Yes you will see that below lol.

Then you place to bake for about 15 minutes on 375. and Voila here it is! If you would like your cheese more browned then you would leave in longer.


OK now if you like your Ziti a little more plain like Jr. Chef and I. Then you would like the recipe below
Ingredients:
1 pound Ground Beef
1 box of Ziti noodles
Pasta Sauce of your choice. We use Del Monte Traditional, and Garlic and Onion
Water
Oil
Onion Powder
Adobo
Black Pepper
Mrs. Dash Original Blend
Mozzarella Cheese

This is what you will end up with.


Just in case you did not know what Del Monte Sauce looked like and you wanted to try the way we make it.


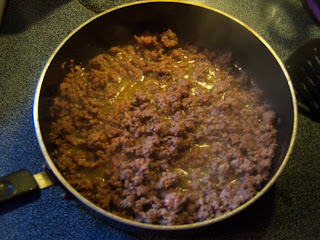
Put your pound of ground beef to slowly simmer. At this point you will add all of your spices.


While the Ground beef is cooking. Place your box of noodles to cook in water and about a tablespoon of oil. To make sure noodles do not stick.


OK the ground beef is ready to be drained and set aside in a bowl or container.


I place mine in a container that can be tightly covered. Since I had to meals going on at once. I wanted to make sure it kept as fresh as possible.


Now here is that Mozzarella that I forgot to post earlier. Yes you can see I wasn't lying. We actually take the time to shred our own cheese.


I like to cut the cheese in half. As it is easier to shred when the piece is smaller. But I do use the whole pound.


See there it is. You feel such a great feeling knowing you did it yourself. Just make sure to watch that you do not cut yourself.


OK the noodles are ready


Now I have taken both sauces and mixed them together. The two cans were enough for both Ziti's especially since PT likes his way more saucier.


Place the noodles in the pan you are going to bake in. At this point I have added some sauce.


I also added ground beef and then placed some of the Mozzarella cheese on top.


Then we repeated the layering. As may have noticed with the first Ziti we mix everything together and with this one it is layered like a lasagna. I know weird but we like them made totally different lol.


We like a lot of Mozzarella if you can't tell. We also like it white and creamy. So we baked for only 10 minutes @ 375 degrees.
Well I hope you enjoyed this session of Meals with Momma, Jr. Chef and our special guest Part- Timer.
I would love to hear what you think and what your favorite way is for Baked Ziti
Blog Widget by LinkWithin

Copyright

MyFreeCopyright.com Registered & Protected

Anniversary

Get your own free Blogoversary button!
web counter
Web counte from website-hit-counters.com .
[Valid RSS]